What are they?
Vector images store lines and shapes as mathematical functions. When the image is rendered on screen, these equations are evaluated at every pixel coordinate to obtain values for the image. Vector images are “lossless” images. Because the functions that define them are independent of pixels, vector images can be scaled up and down repeatedly without effect on the integrity of the images.
When do I use them?
Cutting lines must be defined as vectors for the Trotec software to interpret them properly. Grayscale vector information can also be used directly for engraving, using either Halftone or Relief process options. Colour vector information can be combined with the Colour process option in the Trotec Property Settings to define separate cutting or engraving parameters for different parts of the image.
Preparing Vector Images for Cutting
Cut lines must be set to RGB red, with a thickness of 0.003mm or Hairline. Shapes purely intended to be cut lines should have no fill colour. The colour, thickness, and fill of shapes and lines can be inspected and adjusted in CorelDRAW using the instructions below.
Editing Cut Lines in CorelDRAW
- Open your image in CorelDRAW
- Select your vector with the Pick tool
- The Paint Bucket and Pen icons in the bottom right corner will give you information about the Vector’s current Fill Colour, Line Colour, and Line Thickness
- To change the fill colour, double click on the Paint Bucket icon
- Select “No Fill” in the top right of the popup window
- Click “OK”
- To change the line thickness and/or colour, double click on the Pen icon
- Navigate to the “Colour” parameter near the top left of the popup window, and click on the dropdown arrow
- Move the “R” slider all the way to the right (255), and the “G” and “B” sliders all the way to the left (0). This will set the outline colour to RGB red
- Navigate to the “Width” parameter near the top left of the popup window, and select “Hairline” from the dropdown dox
- Click “OK”


Preparing Vector Images for Engraving
Only grayscale images are used for engraving. Colour images should be converted to grayscale before engraving. Grayscale images will be bitmapped (broken up into a pattern of individual balck and white pixels) by the software.
When working with filled shapes, it is important to pay attention to the thickness and colour of the shape border, as this will also be engraved. To engrave borderless shapes, set the outline to “none”.
Dark/black areas indicate where the laser will engrave; light/white areas indicate where the laser will not engrave. This means that some images may need to be inverted to produce the desired result. Images can either be inverted before printing, or inverted in the Trotec property settings.
Images should be resized to the scale you wish to engrave them at. This can be done in advance, or in CorelDRAW using the instructions below.
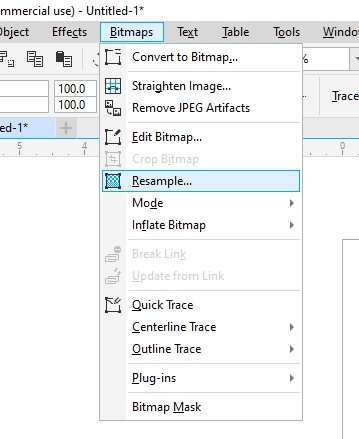
Resizing Images in CorelDRAW
- Open your image in CorelDRAW
- Select your image with the “Pick” tool
- From the top toolbar, navigate to “Bitmaps”
- Select “Resample”
- Use “Width” and “Height” under “Image Size” to modify the image dimensions
- Use “Horizontal” and “Vertical” under “Resolution” to modify the image resolution
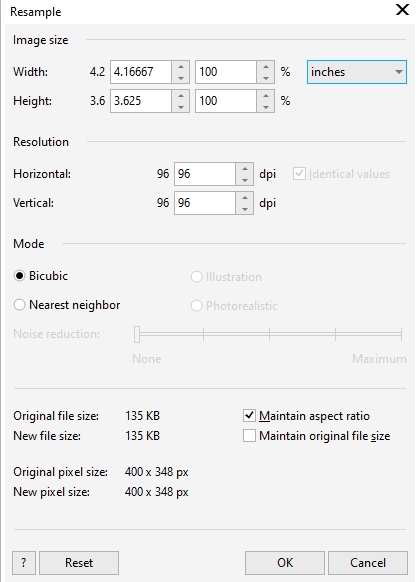
N.B: The resolution of the image will not necessarily be the same as the engraving resolution. The resolution set in the “Process Options” section of the Trotec print interface will override the resolution of the image. However, the original image resolution will affect the appearance of any Halftone setting specified in “Process Options”. In general, downsampling (creating a halftone at a lower resolution than the image) will produce better results than upsampling (creating a halftone at a higher resolution than the image).
Inverting Images in CorelDRAW
- Open your image in CorelDRAW
- Select your image with the “Pick” tool
- From the top toolbar, navigate to “Effects”
- Select “Transform”
- Select “Invert Colors”

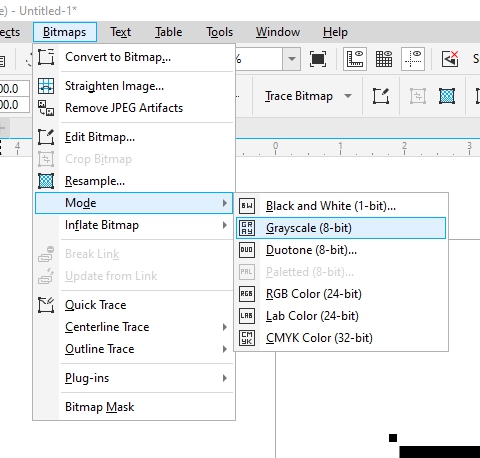
Converting Images to Grayscale in CorelDRAW
- Open your image in CorelDRAW
- Select your image with the “Pick” tool
- From the top toolbar, navigate to “Bitmaps”
- Select “Mode”
- Select “Grayscale (8-bit)”